Instagram Diptych

Last night I had the most vivid dream. I dreamt that I drove something that resembled a Las Vegas theme park. All of the lights, sounds and games were there. The differences became quickly apparent. There were families, and happiness; laughter spread throughout the park.

In addition, it seemed that there was a Kodachrome haze that layered over the park. Colors were more vibrant, and it seemed that I had stepped back into the 70s. It was beautiful, and everyone was happy.

This morning, when I was getting ready, I took Rush downstairs to get some breakfast with me. He was quiet, playing in the front room and I got a little suspicious. When I arrived, he was sitting quietly, playing with a nativity toy set near the tree.

This is Christmas


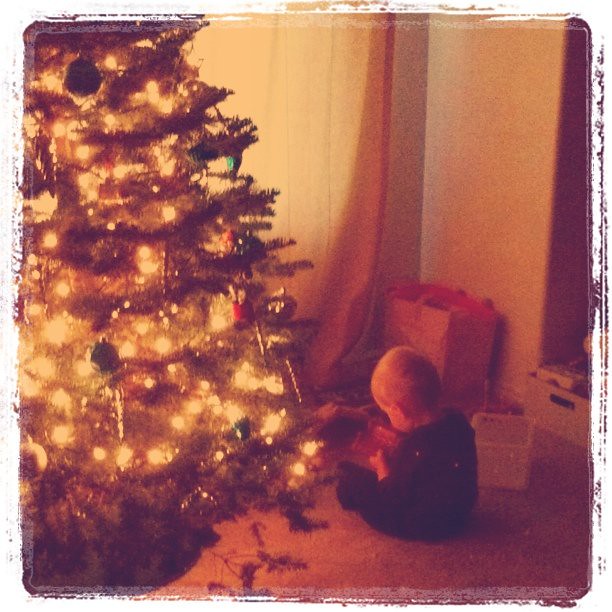
I have been using Instagram for a little while, and I have to admit, I am smitten. Many have written on what is great, but I just want to add my two cents. This morning, when I saw Rush, I had my iPhone in my pocket, and my DSLR on the counter right next to me. To shoot the photo, I had a few options.

  1. Take camera from bag
  2. Take flash out
  3. Meter the flash
  4. Replace 18-135mm with f1.8 50mm
  5. Try to compose a nice photo
  6. Take another one with some different flash settings
  7. Try to wrangle Rush back into the spot
  8. Sync camera with computer
  9. iPhoto to Photoshop for editing
  10. Upload to Flickr
  11. Upload to Facebook
  12. Upload to Tumblr
  13. Tweet off a link

Now, with Instagram

  1. Pull out phone, and take photo.
  2. Add a filter
  3. Blast that photo to Facebook, Tumblr, Flickr, and Twitter (and Instagram too).

The dreamy landscape that I saw in my deep in my sleep, quickly became the photo that I took with my phone. The ability to simply share a photo is something that other apps will do, but the community of Instagram, coupled with the ease of use makes this a winner in my book.

A Fan of Moveable Type…

Had the great pleasure today to go the Crandall Printing Museum in Provo Utah and get a tour of their fine facility. Working in the graphic arts industry, it was awesome to get to see some fully funtional printing presses, and be able to see the technology that brought people out of the Dark Ages, and into the Renaissance.

Looking for something fun to do, check it out!

Minimilist Typography Wallpaper

So, I went out searching for some wallpaper that I could use on my laptop that would be nice and minimal, while at the same time look nice enough. Not finding anything that I liked, and with some spare time, I made my own. Comprised mostly of web-safe fonts, and really nothing very flamboyant. I kind of like them.

WordCamp Vegoose

Just a little wrap up from WordCamp Vegas that was this last weekend. I had a great time, I am always impressed with the WordPress community. Open, caring, and would literally give you warm cookies just for driving down to Vegas.

This trip was a lot of fun. The conference was great, lots of really good, relevant talks. Highlights included Brandon Dove of PixalJar.net gave a great presentation about Child Themes vs. Theme Framworks. Having built a bunch of custom themes and child themes, personally I have stayed away from frameworks, but after hearing him, I kind of want to dig into Thematic and see what else there is to learn. Also really like when we looked into a site and he said, “This filter applies to all the single ladies.” Kind of a WordPress joke…

I had the opportunity to present myself, and was really happy when John Hawkins invited me to come down at WordCamp Utah. I spoke on the Loop, on how to build custom queries, template tags, and working with custom post types. My slides, similar to the WordCamp Utah ones below:

I also enjoyed hearing the flamboyant Eric Marden and hearing him speak on DevCraft: Best Practices for WordPress Teams. I never worked professionally as part of a dev shop, so his comments were interesting on a lot of levels. Taking a lot of his critique and commentary to heart, hoping to become a better developer as a result.

I guess this brings me to the crux. No one is a perfect developer.  For all of the WordCamps that I have been to, (been to eight now in the last two years) there is always something to learn. For the $20-$30 that they normally cost, there is no better way to spend a Saturday learning from everyone around you on how to be a better developer, better blogger, or better designer.

Hope to see you at the next one!

The Fixie Build Part 3

This post is part of a series, see part number one here, and two here.

Freshly partly assembled. (How is my noun/verb ratio going there?

Ready to ride

Picked up a new (to me) set of pedals at Epic biking. Dan charged me $5.00 for the rebuild of the bottom bracket and headset, and $7.50 for the pedals. Great guy.

This post is part of a series, see part number one here, and two here.

The Fixie Build Part 2

This post is part of a series,  see part number two here, and three here.

Got some more work done on the fixie this weekend. Started out by taking it all apart, then stripping the paint. Used sandpaper, a wirebrush, and some other tools.

Long story short, just paint over the top of it. There is absolutely no need to go through that much work. The paint covered just fine, regardless of how much sanding I done.

My little helper...

On the top tube of the bike, there were some guides for for brakes/shifting. Didn’t look that cool so with a hammer, ax, and a grinder, they were quickly no more…

After sanding and stripping paint, it was time for paint.

The vise was super helpful. Especially when painting the fork.

This post is part of a series,  see part number one here, and three here.

The Fixie Build Part 1

This post is part of a series,  see part number two here, and three here.

So, I have been enamored with Fixies for a long time. For the uninitiated, a fixie is a bike that has a fixed hub. What this means is that with every turn of the wheel, there is a turn of the pedals. This also means that there is no coasting, as the hub of the wheel is locked in place.

So, my friend Tyrel’s wife works at the D.I., I told him to keep his eyes peeled for an old road bike that might come in. I want to find one that I convert to a fixie. So, much to my surprise, Tyrel texted me letting my know that there was a fixie in the store, and for only for $35. Hey, for that price, I can’t say no. Just one problem, it was missing a seat…

That was only a temporary. I took it over to Epic Biking this afternoon and got a seat and stem for $20. Not a bad deal at all. Dan always hooks me up…

This evening, I ran by Walmart to pick up a few supplies for the bike. The plan right now is to strip all of the paint down, lay a few coats of matte black, then a few coats of flat clear coat on it. Trying to decide on other colors/decals. Any ideas? I think a pink frame like Kendall has got would be rad, but I think I am going to keep it a little more tame.

I am open to suggestions though!

I started stripping paint this evening. Going to take a few hours for that. Don’t know if my drill will forgive me. Might have to step up to the a grinding pad that I can use with my angle grinder. I’ll keep posting updates.

Future things todo:

  • New tires
  • New grips (bmx style)
  • New pedals
  • Clean rust from rims
  • Custom graphics/emblems (Hey, my brother has a vinyl cutter!)
  • Drop bars?

This post is part of a series,  see part number two here, and three here.